Motivation
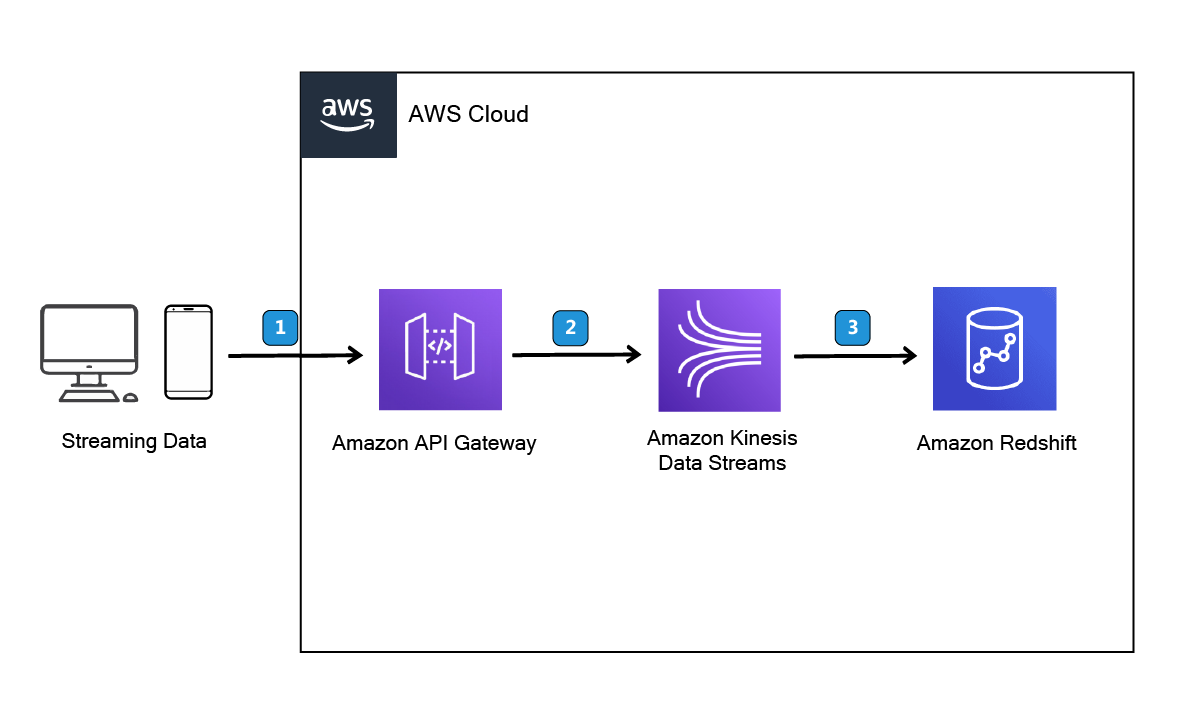
Many use cases require streaming processes for near real-time data analysis with low latency. One such scenario involves gathering user log data to perform analytics or train machine learning models. In this solution, we leverage AWS services such as Amazon Kinesis Data Streams and Amazon Redshift. Here, we focus on creating an API to store user records, but the pipeline can easily connect to other data sources. We'll delve into the details of each AWS module and emphasize the importance of connecting AWS services effectively. From a cost perspective, this solution is cost-effective compared to others and requires minimal configuration, ensuring speedy implementation.
Step 1: Create an Amazon Kinesis Data stream
Amazon Kinesis Data Stream serves as a conduit for seamlessly passing your data, whether for storage or real-time processing. Its primary function is to facilitate data flow. To achieve more complex tasks, additional services are often required to orchestrate processes beyond the stream itself. Here are several options:
- Amazon Data Firehose: This service is ideal for seamlessly storing data in your database.
- Managed Apache Flink (formerly Amazon Kinesis Data Analytics): It enables application consumption and processing of the stream data.
- Custom consumer libraries: These provide flexibility to tailor data processing according to specific requirements.
In this setup, we focus on directly storing data in Amazon Redshift using Redshift digestion, eliminating the need for Firehose to save data to the Redshift warehouse.
Steps to create an Amazon Kinesis Data Stream:
- Open the Amazon Kinesis Console and navigate to Data streams. Then, click on Create data stream.
- Provide a name for the Data stream, such as "mltimes-logger".
- Specify the Number of open shards as "1". (For production scenarios, use the shard calculator to determine the appropriate number of shards.)
- Click Create data stream.
(Note: The chosen name is significant for later reference when specifying which records to pass through. For now, we've used "mltimes-logger" as an example.)
Step 2: Set up Amazon redshift
We've set up a serverless Redshift cluster, although the configuration process remains consistent regardless of whether a server is involved. Begin by creating an Amazon Redshift cluster through a simple click on the create button and follow the default settings. Next, in the left panel, navigate to Query editor V2 to interact with the database via queries.
To map data from Kinesis Data Streams to an Amazon Redshift object, execute the following SQL command:
Replace 'arn:aws:iam::????:????' with your IAM role that has both AmazonKinesis and AmazonRedshiftAllCommands policies attached to it.
At this point, we've merely defined the mapping of stream data to Redshift. However, we need to save the data from the designated queue. Here, we introduce the concept of a MATERIALIZED VIEW, which aids in this process. A MATERIALIZED VIEW is the result of a SQL query that can be utilized later to enhance performance, akin to saving intermediate computations to expedite subsequent calculations. These can be employed automatically when complex queries are executed in the background. In our scenario, we leverage this feature to consume the data stream.
Consider the following SQL query:
CREATE MATERIALIZED VIEW mltimes_endpoint_extracted DISTKEY(6) SORTKEY(1) AUTO REFRESH YES AS
    SELECT
    refresh_time,
    approximate_arrival_timestamp,
    partition_key,
    shard_id,
    sequence_number,
    json_extract_path_text(from_varbyte(kinesis_data, 'utf-8'),'mltimes_endpoint_name',true)::varchar(100) AS mltimesEndpointName
    FROM evdata."mltimes-logger"
    WHERE LENGTH(kinesis_data) < 65355;
In the FROM clause (FROM evdata."mltimes-logger"), we specify reading data from the streaming source. The expression json_extract_path_text(from_varbyte(kinesis_data, 'utf-8'),'mltimes_endpoint_name',true)::varchar(100) AS mltimesEndpointName parses the streaming data and extracts the mltimes_endpoint_name from the JSON. Additionally, there's a filter based on the length of the Kinesis data.
Step 3: Create API gateway
Head over to the API Gateway console and create an API along with a resource. Follow these steps to create a method:
1- For Method type, select PUT. 2- Choose AWS service for Integration type. 3- Select the AWS Region where your Kinesis stream resides. 4- For AWS service, opt for Kinesis. 5- Leave AWS subdomain blank. 6- Pick POST for HTTP method. 7- Choose Use action name for Action type. 8- Enter PutRecords for Action name. 9- Input your execution role's ARN for Execution role. 10- Maintain the default of Passthrough for Content Handling. 11- Click on Create method.
12- In the Integration request section, add the following URL request headers parameters:
13- Now, add the following mapping template to map data from the PUT method request to the corresponding integration request:
{
    "StreamName": "mltimes-logger",
    "Records": [
       #foreach($elem in $input.path('$.records'))
          {
            "Data": "$util.base64Encode($elem.data)",
            "PartitionKey": "$elem.partition-key"
          }#if($foreach.hasNext),#end
        #end
    ]
}
Ensure that the StreamName matches your Amazon Kinesis Data Stream name, and the structure of the Records contains PartitionKey for each record. You can find more details about the request parameters here.
14- Before deploying, you can test your API, check input/output, and even verify that your data appears in the table mltimes_endpoint_extracted. For testing, you can use this payload in your PUT request:
{
    "records": [
        {
            "data": "some data",
            "partition-key": "some key"
        },
        {
            "data": "some other data",
            "partition-key": "some key"
        }
    ]
}
Once testing is complete, you can deploy your API with a chosen stage.
Step 4: Generate data using API
In your API panel, navigate to stages and select your stage to find your Invoke URL. Keep this URL handy and open a notebook to send a PUT request using the Python requests library.
import requests
import json

info_dict = {"mltimes_endpoint_name": "Blog"}
payload = {
    "records": [
        {
            "data": json.dumps(info_dict),
            "partition-key": "p1"
        }
    ]
}

invoke_url = "<INVOKE_URL>"
r = requests.put(invoke_url, json=payload)
It's crucial to maintain the structure of the payload. Since we've defined json_extract_path_text(from_varbyte(kinesis_data, 'utf-8'),'mltimes_endpoint_name',true)::varchar(100) AS mltimesEndpointName, we must include mltimes_endpoint_name somewhere in our JSON payload. Depending on your requirements, you can add any additional fields you need. However, ensure that the value for the data key is a string type. To achieve this, we use json.dumps. Additionally, since the partition-key is required, we include it in the payload. Later on, you may use it to manage different partitions at a lower cost in SQL queries. Finally, it's important to include the json parameter in your PUT request with the described payload (not data=payload).
References
Track and visualize streaming beacon data on AWS
Real-time analytics with Amazon Redshift streaming ingestion
Streaming Data Solution for Amazon Kinesis
Tutorial: Create a REST API as an Amazon Kinesis proxy in API Gateway